Installing a garage door opener outlet is not a difficult electrical project
Your overhead garage door opener provides convenience, personal safety and home security. But, an overhead garage door opener requires an electrical outlet in order to operate. This step-by-step outline will help you install a garage door opener outlet. Installing an outlet for a garage door opener is moderately challenging, requiring basic construction knowledge and comfort working with electricity.
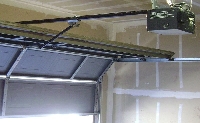
The operator motor of the garage door opener is plugged into an outlet. The outlet must be installed within two feet of the opener motor assembly. The motor assembly and related mounting components will require wood framing to attach the outlet junction box. The garage itself must have an electric circuit present.
Items needed to install a garage door opener outlet
* Electrical outlet including installation kit
* Screwdriver
* Wire stripper
* Electrical pliers
* Electrical tape
* Wire nuts
Now you are ready to undertake installing an outlet that will allow you to operate an electrical overhead garage door opener, and improve outdoor living at your home.
Step 1
The electric junction box and the power feed should be installed by a qualified electrician. Direct the electrician and then check that they are mounted at the correct location within 24 inches of the garage opener motor.
Step 2
Turn off the power to the circuit you are working on.
~
Step 3
Locate and install a junction box within 24 inches of the garage door opener. Screw the junction box to the wood framework with 1″ wood screws. Run a conduit from the existing circuit box up to the new outlet junction box. Install 3 wires from the existing junction box to the new outlet junction box from the existing to bring power to the now one. A white neutral, a green ground and red hot wire will be required.
Step 4
Strip back 3/4 inch of wire insulation on the neutral, hot and ground wire and connect them to the new outlet.
Step 5
To wire the outlet, connect the white neutral wire to the silver screw on the side of the outlet. Connect the hot red wire to wire to the gold screw on the side of the outlet. Connect the green ground wire to the copper or green ground screw on the back of the outlet. Install the cover plate after mounting the outlet to the box with the approved screws.
Step 6
Make the same connections at the existing junction box. Connect the white neutral wire to the white neutral wire in the junction box by twisting them together. Connect the hot red wire to the hot red in the junction box in the same manner. Connect the green ground wire to the copper or green ground to the green ground wire from the junction box. Twist wire nuts on them and wrap with electric tape.
Step 7
Close the existing junction box, plug in the garage door opener motor and turn the circuit back on. Test run the motor to confirm all connections are correct.
Enjoy your electric overhead garage door opener: this basic electrical project is a home improvement that will increase the value of your home and your day-to-day convenience.
Resources:
EZDIY: adding a receptacle for a garage door opener
How to Install a Garage Door Opener