Halloween crafts are a great way to decorate for Halloween
Halloween will soon be here! This is the perfect time to indulge in some fun Halloween crafts. Here are some great ideas for planters that can decorate your front porch along with that Jack-o-lantern, or they will also look great inside on the table for your Halloween party.
Halloween crafts are great to do with kids, this craft is a fun one to do with kids, they may need a little help tracing shapes or with the paintbrush depending on their age. When doing crafts with children, always be sure to use non-toxic paint, remember that if a craft product does not say it is non-toxic, there is no guarantee that it is non-toxic, so be safe and select one that does say that it is non-toxic.
To make these Halloween Spooky Planters you will need:
– terra cotta planters – as many as you would like to make – paintbrushes, one for larger brush work and another for more delicate work – a pencil – black permanent marker – disposable drinking cup (to mix paint in) – paints (for the Jack-o-lantern you will need: orange and black; for the ghost you will need: white and black, for the black cat you will need black, white, yellow and green) – newspaper to protect the surface you are working on – also – a plant to go in the planter once you are finished. I suggest some lovely fall colored mums.
To begin the project, lay out your newspaper, ideally a double layer to protect the surface that you are working on. Be sure to select a surface where the object can dry for at least a couple of hours.
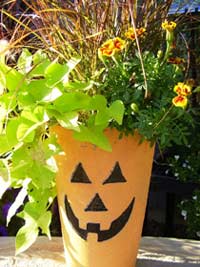
To make the Jack-o-lantern pumpkin planter here are the steps you will take:
Begin by painting the terra cotta planter completely orange, except for the rim of the planter. Give it two coats of paint so that it looks very orange. Allow the paint to dry.
Then paint the rim of your planter green. Again, give this rim two good coats of paint.
Once the orange paint has dried, it is time to draw a Jack-o-lantern face on it. This is your time to be creative! Draw a friendly face, a spooky face, whatever you desire using your pencil. Then fill in your penciled features with your black paint.
Allow the black paint to dry. Once the features have dried, your pumpkin is ready! Add your plant to your planter and place where you think it will look best.
To make a Ghost planter here are the steps you will take:
Begin by painting your planter completely white, give your planter two good coats of paint. Paint the rim of the planter white also. Allow this paint to dry. ~Once that white paint has dried, take your white and black paint and mix some together to create grey paint. You can do this in a disposable drinking cup. You will use this paint to create features on the planter.
Now that you have grey paint, it is time to create features for your ghost. Most spooky ghosts just have two eye holes and a wide open mouth, but you can create whatever features you desire. Draw the features on using your pencil. Then fill them in using your grey paint.
A great idea for the rim of the planter is to paint a Halloween greeting on it. You can use the black paint and paint “Happy Halloween” and “Boo” all the way around it. Another idea for good clear writing is to use a black permanent marker.
Once your Ghost planter has dried, it is ready for you to place on your porch or wherever you choose.
To make a Black Cat planter here are the steps you will take:
Begin by painting your planter completely black. Give the planter two good coats of paint. But paint the rim of your planter yellow or green (to match the cat’s eyes). Allow this paint to dry.
An idea for the rim of the planter is to paint a Halloween greeting on it. You can say something like “Happy Halloween” and “Meow!”.
Now mix some of your white and black paint together to create some grey paint. Use a disposable drinking up to mix your paint. You will use this to create the cat’s ears, nose and whiskers. It is very hard to draw on black paint with your pencil, so simply get a good idea of where you want your features to be and paint them on. Let the features dry for a couple of minutes before adding the eyes.
To add the eyes you are going to be using both your yellow and green paint. Alternate your yellow and green paint to create a great cat’s eye. Remember that in the middle you are going to put a small black dot, signifying the iris of the eye. You will do this once the eye paint has dried.
Add the iris of the eye using your black paint once the eye paint has dried.
Once the paint is dry your planter is ready for you to use. Once that white paint has dried, take your white and black paint and mix some together to create grey paint. You can do this in a disposable drinking cup. You will use this paint to create features on the planter.
Now that you have grey paint, it is time to create features for your ghost. Most spooky ghosts just have two eye holes and a wide open mouth, but you can create whatever features you desire. Draw the features on using your pencil. Then fill them in using your grey paint.
A great idea for the rim of the planter is to paint a Halloween greeting on it. You can use the black paint and paint “Happy Halloween” and “Boo” all the way around it. Another idea for good clear writing is to use a black permanent marker.
Once your Ghost planter has dried, it is ready for you to place on your porch or wherever you choose.
To make a Black Cat planter here are the steps you will take:
Begin by painting your planter completely black. Give the planter two good coats of paint. But paint the rim of your planter yellow or green (to match the cat’s eyes). Allow this paint to dry.
An idea for the rim of the planter is to paint a Halloween greeting on it. You can say something like “Happy Halloween” and “Meow!”.
Now mix some of your white and black paint together to create some grey paint. Use a disposable drinking up to mix your paint. You will use this to create the cat’s ears, nose and whiskers. It is very hard to draw on black paint with your pencil, so simply get a good idea of where you want your features to be and paint them on. Let the features dry for a couple of minutes before adding the eyes.
To add the eyes you are going to be using both your yellow and green paint. Alternate your yellow and green paint to create a great cat’s eye. Remember that in the middle you are going to put a small black dot, signifying the iris of the eye. You will do this once the eye paint has dried.
Add the iris of the eye using your black paint once the eye paint has dried.
Once the paint is dry your planter is ready for you to use.