Step-by-step instructions can make anyone an expert for a day.
New cabinets can add life and style to any kitchen, creating extra storage and a new feel to the busiest room in any home. Having kitchen cabinets hung by professionals can be costly and knowing how to do the job yourself can save you thousands of dollars. Follow the tips below to learn how to hang kitchen cabinets and become your own hand for hire.
Step One: Inspection
Unpack and inspect the cabinets, checking for any dings or marks. Ensure that everything you’ve ordered is present. In addition, check to make sure the dimensions match your measurements.
Step Two: Measurement
Using measuring tape, pencil and ruler, mark out the position of the cabinets on the wall. Measure from the bottom upward remember that a counter will top the base cabinet, which will be approximately an inch and a half thick. Base cabinets are usually 34 to 35 inches high; the distance between the counter top and the wall cabinets should measure about 18 inches. Therefore, when measuring you’re looking at about 54 inches total. Mark off 54 inches with your pencil (or whatever your own measurement comes to), and draw a level line. Tack a piece of one-by-four on the wall along the level line to provide you with temporary support for the wall cabinets as you put them up.
~
Step Three: Assembly
First, be sure you have the best kitchen cabinet hardware. If required, assemble the overhead cabinets. First, install wooden dowels to strengthen the cabinet and help position the parts for assembly. Apply wood glue to the pre-drilled holes, making sure to thoroughly coat the surfaces. Insert the dowels and tap them into place with a hammer. Follow the instructions that came with your cabinets to begin the assembly process. If your cabinets were pre-assembled, this step is unnecessary.
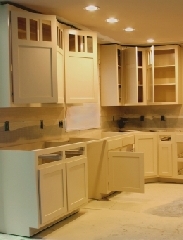
Step Four: Hang Overhead Cabinets
Professionals swear by attaching the cabinets together in order to hang, rather than hanging one at a time. Lay the cabinets on their backs and check to make sure they are flush with one another. (If they are not, insert a putty knife underneath the cabinet. The further you push it in the higher it will raise the lower cabinet). Secure the even surfaces together with clamps and then attach with wood screws. Locate and mark the wall studs.
The backside of the cabinets will have a hanging strip. This is a one-inch strip of wood. The screws have to go through this strip, as the back of the cabinets are too thin and will not be able to support the weight of the cabinet. Transfer the stud locations onto the hanging strip so you can see where you have to drill. Set the bottom of the cabinet on the one-by-four you installed for support and attach the cabinet through the marks you made on the hanging strip. Remove the ledger strip and use it as you continue to hang kitchen cabinets.
Most kitchen cabinets come with brackets provided by the manufacturer. These brackets can be fit to the wall (through the studs) and the cabinets affix to the brackets. This method of hanging kitchen cabinets tends to be easier so if you have a choice, purchase or order cabinets that come with brackets.
Once they’re up, attach doors and hardware and you’re done. Congratulations! You just became a professional.