Grow Rock Candy Sugar Crystals: A Fun, Educational and Delcious Science Project
Crystals come in a wide variety of shapes, sizes and materials ranging from brilliant and rare diamonds and rubies to common household items such as sugar and salt. Even snowflakes, formed by water freezing in the sky, contain ice crystals.
The word ?crystal? originates from the Greek word ?krustallos?, a term the ancient Greeks used to describe quartz crystals. What are crystals and how are crystals formed? This question has intrigued humans for centuries. Quartz crystals have been used in jewelry, decorative items and as healing stones throughout time.
Crystals are unique in that they are solids, naturally formed by regular, repeated patterns of atoms and molecules joining together. In fact, the primary building block of crystals ? called a Unit Cell- is repeated in precisely the same arrangement over and over throughout the entire crystal. This repetition of patterns is what gives crystals their beautiful and mesmerizing shape.
Crystals can be formed in a variety of ways; through the process of evaporation, through freezing, and through the process of major temperature fluctuation, such as when magma cools after a volcano erupts. Today, some crystals are created artificially in scientific laboratories.
Children are often curious about the formation of crystals. Many grade school experiments and hands on science projects are aimed at educating children about the formation of crystals. If you are a teacher searching for workbooks and educational supplies to help children answer the question, “How are crystals formed?”
~
Here is a fun, educational? and delicious science project that children are sure to enjoy.
How Are Crystals Formed?
Find out! Grow Rock Candy Sugar Crystals in Your Classroom!
For this hands-on science project you will need the following materials: a cup or jar, a long pencil, a piece of cotton or wool string, sugar, a spoon, and a kettle of boiling water. Food coloring is optional.
1) Begin by boiling water in a pot or tea kettle.
2) Pour boiling water into your selected container- ideally a mug, jar or cup. Ensure that the container is a suitable material to withstand the temperature of boiling water.
3) Slowly Scoop teaspoons of sugar, one at a time, into the cup of boiling water. Stir each teaspoonful until it dissolves in the water.
4) Continue adding sugar until it begins to accumulate at the bottom of the cup. When the sugar will dissolve no further, this means you have reached the saturation point of the solution. Stop adding sugar once your solution is fully saturated.
5) If you desire colored sugar crystals, stir in a few drops of food coloring at this point.
6) Tie a length of cotton or wool string firmly to the middle of a pencil or long stick. (Crystals will not grow on nylon or some types of synthetic string.)
7) Lay the pencil or stick across the mouth of the jar so that the string hangs into the solution of sugar water.
8) Place the container somewhere safe where crystals will be able to grow undisturbed for several days. Avoid any locations where the container might be bumped or knocked over.
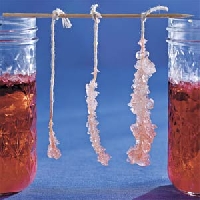
9) Check on the crystals daily. Even after just a day or two, you will notice small crystals beginning to grow along the string.
10) Allow the crystals to grow until they reach a desired size, or until they stop growing. At that point, the string of crystals may be removed and left to dry. Enjoy eating your finished crystals!
After children or students have completed this science experiment, instructors may wish to handout worksheets, or encourage classroom discussion around the question, “How are crystals formed?” Ask students to share aloud, or write down what they observed during this project.